

Account Tracker is a powerful personal finance app that helps you track spending and monitor balances across multiple accounts. Selected as an Apple “Staff Favourite” in the UK, it is supported on all iPhone, iPad and iPod Touch devices running iOS 12 or above.
This companion app supports two-way syncing with your iOS app (over iCloud Drive or Dropbox), letting you view, edit and manage your data on the bigger screen of your Mac. You can also add and bulk edit transactions and easily reconcile your accounts. Changes are automatically synced back to your iOS devices when the Mac app is closed (Command-Q).
For support, PLEASE DO NOT use the App Store as reviews are left anonymously and I have no easy way of contacting you if I have questions (each message has to go through Apple’s review process, taking days!). Instead, start off with my support page, where known issues and any workarounds are posted as soon as I find out about them. Or contact me directly and you will get a very quick response.
Getting Started
When you first launch the app, you are prompted to enable syncing (covered in the next section below) or manually open and view (but not edit!) your data from an iOS backup file.
The app will display a file open dialog. Simply navigate to where your backup files are stored (perhaps in iCloud Drive or your Dropbox folder?) and select the most recent .atb file.
If using this mode, the remainder of the documentation still applies, however you are restricted to viewing your data only.
Syncing
Both iCloud Drive and Dropbox are supported. The old (legacy) iCloud is provided for backwards compatibility only so if you are starting from scratch, use iCloud Drive instead. In the rest of this page, references to iCloud also refer to iCloud Drive.
If you choose Dropbox, you will be prompted to link the Mac app to your Dropbox account.
If you have used syncing before, you will be familiar with the setup steps.
Step 2/5 is where your Mac app has yet to see your PRIMARY. Make sure your iOS device has iCloud or Dropbox enabled (as appropriate) and you have turned syncing on in the settings (this was step 1/5).
In step 3/5, your Mac has made itself known to iOS and is waiting for the initial sync from your PRIMARY device. Leave this popup visible. Run Account Tracker (Pro) on your PRIMARY device (on iOS), and after a minute or so, you will see the step 4/5 popup. Your Mac has been seen and you can start the initial sync.
Back on your Mac, eventually the previous popup is automatically dismissed and you will see step 5/5 where the initial sync has completed. You can then select OK to continue.
If you select Cancel from any of these initial prompts, the app will close as it requires syncing to work.
If you ever want to disable syncing to start again, this can be done from the File menu.
PIN protection
If your data (on iOS) is PIN protected, the app will not display anything until you enter your PIN. Alternatively you can use the touch bar on supported Macs. Selecting Cancel will close the app.
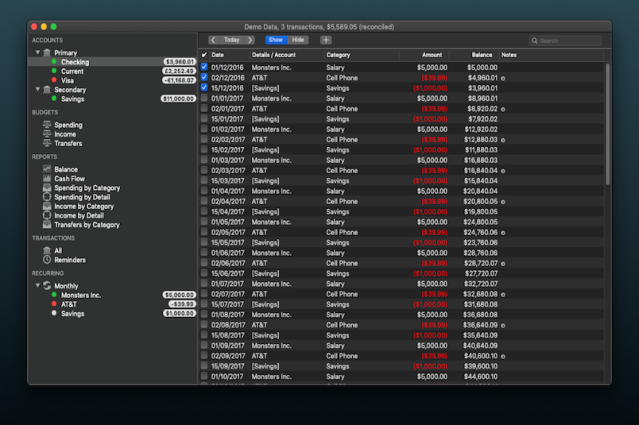
Main Screen
Your accounts are shown down the left hand pane of the main screen (in groups), together with four budget views, seven report views, and views for all transactions, reminder transactions and recurring transactions. Basically the same data as you see on iOS.
You can collapse the account groups, and also hide any main groups you do not want to see (not ACCOUNTS, but perhaps BUDGETS or RECURRING transactions). The app will remember your choices and try to restore them each time it is launched.
To change your account balance view (between Today, Available, Minimum and Reconciled), use the View menu.
To view an account’s settings, right (or Control) click on the selected account row.
Accounts
Select an account and its transactions will be shown in the right hand pane. Use the left arrow to scroll to the beginning of the list, Today to make the most recent transaction visible, and the right arrow to scroll to the end of the list, and then forwards a month at a time.
Show/Hide can be used to show or hide reconciled (ticked) transactions.
To add a transaction in the selected account, select the + button. A dropdown menu lets you choose the transaction type, e.g. spending, income, a spending refund or a transfer. For the latter you can choose the other account (i.e. a transfer from or to this other account). The new transaction is added to the list and then selected to allow editing (see below).
Search lets you filter the transactions shown. You can narrow this down to a specific date by including //yyyymmdd at the end of the search text. yyyymm or yyyy also work, as does the range yyyymmdd-yyyymmdd.
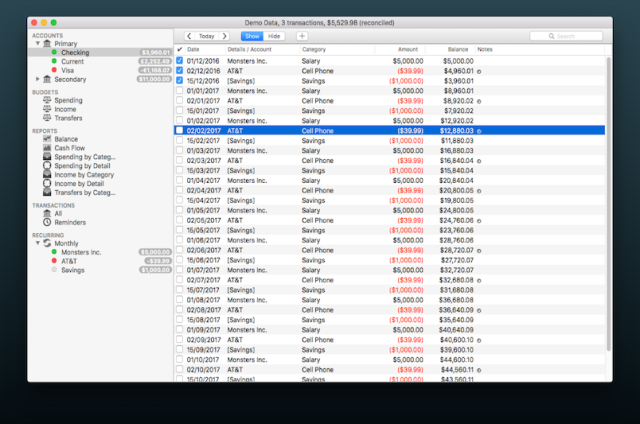
Reconciling an Account
If you have enabled manual reconciling on your iOS device(s), the tick checkboxes on the account screen become editable.
Any changes to these will update your reconciled balance shown in the left hand pane.
Editing Transactions in an Account
Most columns (and all rows) on the account screen are editable.
Double clicking on the date lets you move the transaction. When navigating the dates themselves, clicking and holding on the arrows scrolls a month at a time (quite quickly). Note that for recurring transactions, only the occurrence is moved (see the Adding Recurring Transactions section below).
Double clicking on the details field lets you edit the location or payee/payer for the transaction (non-transfers only).
To cancel editing and throw away your changes, click Escape. To save, click Return. To save and move on to the next field, click Tab.
Double clicking on the category, cheque, amount and notes fields lets you edit these too. If a transaction has splits enabled, these will be overridden by your choice of category (see Restrictions below).
Only accounts with cheques enabled will have the Cheque # column. Only numbers are accepted.
The amount is in the account’s currency. You cannot edit foreign transaction amounts (see Restrictions below).
Note that for recurring transactions, only the occurrence is edited for cheque number, amount and notes.
Context Menu
Selecting a row and right (or Control) clicking brings up a context menu, providing many more options.
The details and category fields can be selected from a list of those currently in use.
For non-transfers, you can change the transaction currency if it is different from your account currency (e.g. if spending abroad). There are options to automatically calculate the other currency amount using the latest exchange rate, or you can simply edit the two currency amounts manually.
You can edit the repeat interval for recurring transactions, unless they have already been set up or have had occurrences edited. For existing series, you can only edit the period on the first occurrence.
You can view the “end repeat” settings. To actually end a series, simply select the first occurrence you want to get rid of and delete it (see below).
You can copy or duplicate a transaction, copy it to today, move it to yesterday, today, tomorrow or Monday, or move it to a different account.
You can change the transaction type (spending, income, refund … etc) or reverse a transfer.
The reminder flag is something set and used on iOS. While you can view and edit it here too, it is not used on the Mac.
Finally you can delete a transaction, or end a series (by deleting the occurrence plus all future ones).
Bulk Editing
If you select multiple transactions, most of the context menu options are still available to you. This is a VERY powerful feature, so be careful!
You can bulk move transaction to yesterday, today, tomorrow or Monday, move non-transfer transactions to another account, set the details (for non-transfers) and category fields and set or clear the reminder flag.
You can also bulk delete non-recurring transactions.
Adding Recurring Transactions
The best way to do this is to first create a transaction then set its start date, details (for non-transfers), category and amount. Then using the context menu, set the recurring interval.
Once created like this, it is easy to then edit each occurrence, e.g. by moving its date or changing an amount.
Budgets
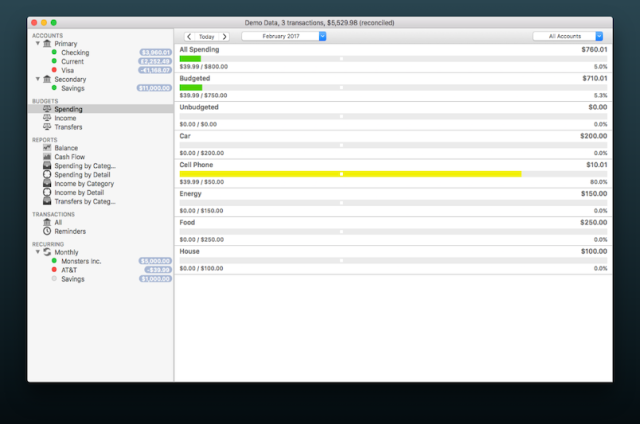
Select one of the four budget views (Spending, Income, Transfers, Fixed) to see your budgets in the right hand pane.
Select the dates to change the period, and for floating budgets use the left and right arrows to step backwards and forwards through time (or set the custom dates).
Select the accounts or groups to further customise your budgets.
Double click on one of the budget rows to see your transactions, and select Done to return.
Reports
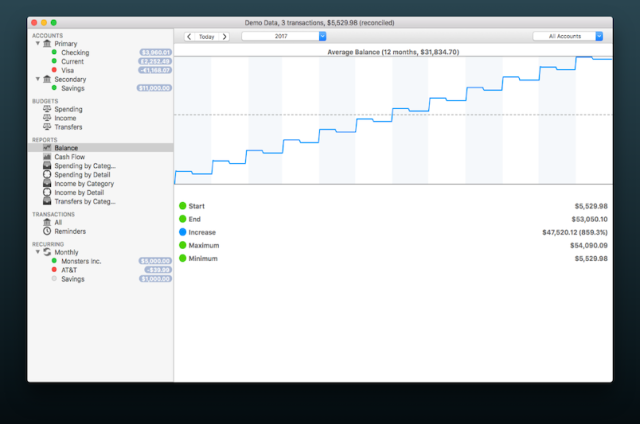
Select one of the seven report views (Balance, Cash Flow … etc) to see your reports in the right hand pane.
Select the dates to change the period, and use the left and right arrows to step backwards and forwards through time (or set the custom dates).
Select the accounts or groups to further customise your reports.
When viewing the balance chart, click and drag the graph to display actual end of day balances at different points in time.
When viewing a yearly cash flow chart, double click the chart itself to switch between viewing the whole year vs a monthly breakdown.
When viewing the pie charts, select List (or double click) to show more than just the top 10. You can then double click on one of the rows to see your transactions, and select Done to return.
Transactions and Recurring Series
Select one of the transaction views and they will be shown in the right hand pane. Use the left arrow to scroll to the beginning of the list, Today to make the most recent transaction visible (if applicable), and the right arrow to scroll to the end of the list, and then forwards a month at a time.
Show/Hide can be used to show or hide reconciled (ticked) transactions.
Search lets you filter the transactions shown.
Some columns (and all rows) on the all/search screen are editable.
Exporting and Importing Transactions
If you are viewing an account or one of the transaction views in the left hand pane, you can export the selected transactions as a CSV (comma separated values) file from the File menu.
To import transactions from a CSV file, use the Open File dialog from the File menu. The file must be in the (fairly strict) format as used by iOS, specifically one row per transaction with NO header row, ideally in date order (oldest first). There should be exactly eight columns as follows:
- account name – this must match the exact name of an account you have already created in the app (e.g. Mastercard)
- date – this needs to be in the format dd/mm/yyyy hh:mm:ss. You can leave out the :ss, or simply use dd/mm/yyyy if you like, as long as all rows in the CSV file are the same
- details – the details field of the transaction (e.g. payee); can be left blank
- category – the transaction category; can be left blank
- notes – any notes to add to the transaction; can be left blank
- cheque/check number; can be left blank
- amount – the amount in the currency of the account; for spending this should be negative
- reconciled – either Y or N, indicating whether or not the transaction has been reconciled
A sample row might read …
Mastercard,28/05/2010 09:00:00,Apple,Gadgets,iPad,,-429.00,Y
For transfer transactions, simply replace the details column with the other account name enclosed in [], e.g. [Visa]. A negative (or 0) amount is a transfer from column 1 to column 3, a positive amount from column 3 to column 1. You can also import transfer transactions as two separate rows – see my support page for more details.
Note, if your region uses a comma as your currency separator, the amount needs to be included in quotes, e.g. “-429,00”.
Restrictions
The app as it currently stands has a few restrictions.
Accounts cannot be added or removed directly from the Mac. Do this on iOS and the changes will be synced.
Account groups are only partially supported. They are visible of course, but to add, edit or delete groups, use iOS.
Account settings can be viewed by right (or Control) clicking on the account in the left hand pane. To change them, use iOS.
Split transactions cannot be created or edited on the Mac. You can view them of course, and the budgets and reports work as expected. But all manipulation, from creating to editing, needs to be done on iOS.
Budgets cannot be set or edited on the Mac. However you can view them and change the dates and accounts they work over to analyse your data.
Use of 3rd party software – PXSourceList
PXSourceList is licensed under the New BSD License, as detailed below (adapted from OSI http://www.opensource.org/licenses/bsd-license.php):
Copyright © 2009-14, Alex Rozanski and other contributors. All rights reserved.
Redistribution and use in source and binary forms, with or without modification, are permitted provided that the following conditions are met:
Redistributions of source code must retain the above copyright notice, this list of conditions and the following disclaimer.
Redistributions in binary form must reproduce the above copyright notice, this list of conditions and the following disclaimer in the documentation and/or other materials provided with the distribution.
Neither the name of the author nor the names of its contributors may be used to endorse or promote products derived from this software without specific prior written permission.
THIS SOFTWARE IS PROVIDED BY THE COPYRIGHT HOLDERS AND CONTRIBUTORS “AS IS” AND ANY EXPRESS OR IMPLIED WARRANTIES, INCLUDING, BUT NOT LIMITED TO, THE IMPLIED WARRANTIES OF MERCHANTABILITY AND FITNESS FOR A PARTICULAR PURPOSE ARE DISCLAIMED. IN NO EVENT SHALL THE COPYRIGHT HOLDER OR CONTRIBUTORS BE LIABLE FOR ANY DIRECT, INDIRECT, INCIDENTAL, SPECIAL, EXEMPLARY, OR CONSEQUENTIAL DAMAGES (INCLUDING, BUT NOT LIMITED TO, PROCUREMENT OF SUBSTITUTE GOODS OR SERVICES; LOSS OF USE, DATA, OR PROFITS; OR BUSINESS INTERRUPTION) HOWEVER CAUSED AND ON ANY THEORY OF LIABILITY, WHETHER IN CONTRACT, STRICT LIABILITY, OR TORT (INCLUDING NEGLIGENCE OR OTHERWISE) ARISING IN ANY WAY OUT OF THE USE OF THIS SOFTWARE, EVEN IF ADVISED OF THE POSSIBILITY OF SUCH DAMAGE.
Feedback
Account Tracker for Mac is not designed to be a standalone app, i.e. some (less critical) functionality must be done on iOS and synced to the Mac. However I do appreciate everyone uses the app differently, and perhaps some things that are important for you might not (yet) be supported.
If you have any requests, please get in touch.
Thank you for your ongoing support!
